
A Google Grant Guide helps nonprofits get $10,000 in free monthly ads through Google Ad Grants. To qualify, nonprofits need to create TechSoup and Gmail accounts, apply for Google for Nonprofits, get a TechSoup validation token, and set up a Google Ads account before enrolling in the Google Ad Grant program.
Do you want $10,000 of free advertising on Google every month?If you want to know more about Google Ad Grants for churches or Google Grants for nonprofits, you’re in the right place!
Google Ad Grants is a powerful tool that can help you get in front of thousands of additional people every month.
In this guide you will learn how to sign up for the Google Ad Grants.

The Google Ad Grant is the most effective way to get your non-profit organization in front of the people that matter most.
Not only that, it’s free to signup and get approved.
Here is what you can do with $120,000 of Google Ads every year:
- Serve targeted ads to your organization’s most important audiences.
- Increase your organization’s reach by getting new visitors to sign up for your emails.
- Increase donations and product sales.
- Send 5,000-15,000+ new visitors to your website each month.
GOOGLE GRANTS ELIGIBILITY
The big question everyone wants to know is “Do I qualify for the Google Grant?
In order to be eligible for the Google Grant you must meet the following criteria:
- Have a registered nonprofit in one of Google’s approved countries. You can find Google accepted list of countries Here.
- You are not a hospital.
- You are not primarily an educational institution.
- You’re are not a government organization.
If you meet those criteria, you qualify to receive the Google Ad Grant!
HOW TO APPLY FOR THE GOOGLE GRANTS
The great news is that the Google Grant Application process is much more streamlined than it used to be.
With that said, there are still multiple steps involved, multiple accounts involved, and multiple applications involved.
I decided to write this post in case you are considering getting the grant by yourself.
Besides providing you with the eligibility requirements and step-by-step instructions (which are much easier to follow than Google’s), I’ll take the next few sentences to try to explain each Google party involved in the Google Ad Grants process.

Get A Proven Marketing Plan That Increases Enrollments When You Book A Call Today!
Receive customized advice to help your school attract more families!
The Google Grant involves four parties on Google’s side consisting of:
1.) TechSoup: Connects nonprofits to software, hardware, and services. They provide validation of your nonprofit to Google to confirm you’re “legit” before Google hands over the grant money.
2.) Gmail Account: You will need to create a basic email account through Google.
3.) Google For Nonprofits: This is the nonprofit arm of Google. You must have a Google For Nonprofits account to apply for the Google Ad Grant. In addition, Google For Nonprofits also gives organizations a few other services like free G-Suite, and Youtube for Nonprofits.
4.) Google Ads: Google Ads is an online advertising service developed by Google, where advertisers pay to display brief advertising copy on the Google.com search results. The $10,000 monthly Google Grant is applied as a credit into your Google Ads account. This Google Ads account will not function as your Google Ad Grant account.
If you are enjoying this post – you will really love our ultimate guide to church marketing titled, Digital Marketing For Churches: #1 Church Marketing Guide.
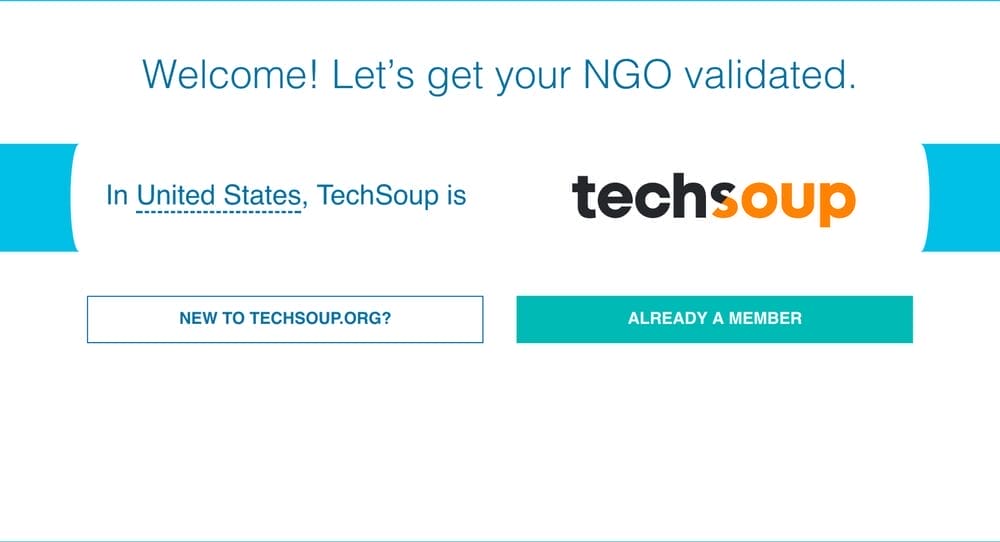
STEP 1: CREATE A TECHSOUP ACCOUNT
Google for nonprofits has partnered with TechSoup to certify the status of your organization’s 501(c)3.
Before getting the grant, you must create a TechSoup account.
You can create an account at https://www.techsoup.org/joining-techsoup/registration.
The TechSoup account creation process can take a few days to verify.
STEP 2: CREATE A GMAIL ACCOUNT
The Google Ad Grants is a service offered within the Google For Nonprofits program.
Before we secure your grant, you must first apply for Google For Nonprofits.
You will need a Gmail account to connect your Google For Nonprofits account too.
If your nonprofit uses Gmail as your email provider and has a basic account (ex. info@yournonprofit.com) you can use this account to sign up for Google For Nonprofits.
If you use another email provider (Ex: outlook) you will need to create a new Gmail account specifically for Google For Nonprofits (something like adsyournonprofit@gmail.com or yournonprofit@gmail.com). This step only takes a few minutes.
*Also, do not use a personal Gmail account. People/employees can come and go and you don’t want to track down this information in the future!*
**Also, write down your account information**
STEP 3: APPLY FOR GOOGLE FOR NONPROFITS
Now that you have your TechSoup login information and Gmail account login information, go to:
- https://www.Google.com/nonprofits/
- Click on the “GET STARTED” button.
- Select the correct email account to sign up with
- Verify that you meet the Google Grant criteria by clicking “NEXT”
- Click on the “Create A New Application” button. This will take you to the Google For Nonprofits application page.
- Before starting the application, click the round icon in the top right corner of the page (next to the bell/notifications icon).
- Verify that the Google account currently logged in is the account you would like to apply with.
- Then, select your country and check the terms of service boxes.

STEP 4: GET YOUR VALIDATION TOKEN FROM TECHSOUP
When you get to the last part of the Google For Nonprofits application, you will see that Google asks for your TechSoup validation token.
- Click the link that says “Get a Validation Token” or just visit https://app.ngok.techsoupglobal.org/UserLogin.aspx.
- Click on the “Already A Member” button.
- Enter your login information.
- Copy your validation token. It should look something like this: 123a4567@MyOrgName
- Paste the TechSoup validation token into your Google For Nonprofits application.
- Submit your Google for Nonprofits application.
It may take three to five days for your organization’s Google For Nonprofit account to be approved.
Google Ad Grant Qualification Quiz
Once your Google For Nonprofits Account is approved, it’s time to take your qualification survey and quiz.
Log into you Google for Nonprofits account with the SAME EMAIL you used to sign up.
Navigate to the Google Ads Grant and click “Enroll” (or whatever the button happens to say – it’s always changing.)
After clicking enroll, you will be prompted to take a qualification quiz. The video below will tell you what to expect from this quiz.

STEP 5: OPEN A GOOGLE ADS ACCOUNT
After you have completed the Google Ads Grant qualification quiz, it’s time to open your new Google Ad Grants account.
If you try accessing your Google Grant account by setting up a Google Ads account through the Google Ads homepage (ads.google.com) YOU WILL NOT BE ABLE TO CREATE A GOOGLE AD GRANTS ACCOUNT.
This step can be tricky for those who have never applied for the grant before, so don’t get frustrated if things get sticky.
The video below will help you set up your new Google Ad Grants account.
Access Your New Google Ad Grants Account

To access your new Google Ads grant account, sign in to the email you opened your Google For Nonprofits account with and accept the invitation to your new Google Ads account.
Get A Proven Marketing Plan That Increases Enrollments When You Book A Call Today!
Receive customized advice to help your school attract more families!
If you have any issues opening your account, you can call the Google Ads customer support number below.
1.) Call the Google Ad Grants phone number at 1-855-607-0431. (They usually answer the phone quickly.)
2.) Provide the account specialist with your Google Ads account ID and the email associated with the account.
3.) Let the account specialist know you are trying to open your new Google Ad Grants account.
4.) If worse comes to worst, ask to share your screen with your Google Ads account specialist. To do this, your account specialist will send a screen share request to the email linked to your Google For Nonprofits account. Click the link they email to you.
Caution: If you see this red banner in your new Google Ads account, DO NOT enter your billing information. This banner will disappear once you have been accepted into the Google Grant program. (This issue seems to have been solved but just in case, never enter billing information into a Google Grant account).
If you’re still having trouble getting your Google Ad Grant, you can book a 1-hour Google Grant consultation call at this link for $150.
IMAGE
Claim your ministry marketing strategy session today!
We Review Your Marketing Efforts & Show You Areas To Improve.
STEP 6: SET UP YOUR GOOGLE ADS ACCOUNT
UNDERSTANDING GOOGLE ADS ACCOUNT STRUCTURE


Before you begin building out your organization’s Google Ads account, it’s important to have an understanding of the Google Ads account hierarchy.
There are four levels within a Google Ads account.
Account Level: Account level settings are the highest level settings and will apply to everything in your Google Ads account.
The Google Ad Grant requires your account-level settings be set up according to specific rules.
Campaign Level: A Google Ads campaign contains multiple groups of ads. Generally, a campaign is used to group similar products or services.
Campaign level settings will apply to all of the ad groups contained within the campaign.
Ex: An organization may have more than one product or service. If an organization has affordable counseling and a weekly soup kitchen, the organization would create an “affordable counseling” campaign and a second campaign entitled “soup kitchen”.
Ad Group Level: An ad group represents a single product or service you want to serve ads for.
Ad groups are housed in an ad campaign.
There can be multiple ad groups inside each ad campaign.
Ex: One ad group within the “affordable counseling” ad campaign may be “anxiety counseling” and a second ad group might be “trauma counseling”. Each ad group represents a slightly different service that still belongs within the affordable counseling campaign.
Individual Ads: Ads are written and saved within each ad group.
As ads are served to Google searchers, data is stored on the performance of each ad.
As the data is accumulated, you can decide which ads are working and which aren’t.
Having at least two ads per ad group will allow the ads to compete with one another, helping you to see what’s most effective.
UNDERSTANDING GOOGLE ADS TERMINOLOGY
Pay Per Click (PPC) Advertising: PPC advertising is an advertising model where ads are shown and can be seen by viewers at no cost. Cost is incurred only when someone clicks the ad and is linked over to the advertiser’s website. PPC advertising is the model employed by Google Ads.
Impression: An impression is counted when your ad is viewable on someone’s screen.
Click: A click is counted when someone clicks on one of your ads.
Conversion: A conversion occurs when someone clicks on your ad, is transferred to your landing page and then completes a specified goal on the landing page. A conversion is normally an email signup but may be a purchase, download, view of a key page, phone call, etc.
Cost Per Click (CPC): Depending on how competitive your market is, a single click may cost more or less money. Cost per click will tell you how much any individual click costs. The price of each click is determined by an incredibly fast auction that takes place as the Google search results are loading.
Avg CPC: Average cost per click shows the average price you are paying for each click. You may want to increase or decrease your avg cost per click depending on your advertising goals. Avg CPC is very useful when looking at thousands or tens of thousands of clicks on a single ad or keyword.
Click-Through Rate (CTR): CTR measures the average number of people who see your ad and then continue to click on it. Generally, CTRs are between 1% and 10%. If an ad has a 5% click-through rate, then 5 people click the ad out of every 100 people who see it.
Conversion Rate: Conversion rate is the percent of people who take the desired action on your landing page. If a landing page has a 5% conversion rate, then 5 out of every 100 landing page visitors take the action you have asked of them.
Cost Per Conversion: This measures the average cost to get one conversion on your landing page. The cost to get a conversion varies dramatically depending on many factors. Conversions may cost less than a dollar or more than one hundred dollars.
CHOOSE AND ADD YOUR FIRST KEYWORDS
What is a keyword?

A keyword is a word or phrase that someone enters into the Google Search Engine. Google then matches these keywords with the most relevant content.
Here are some examples of keywords:
- Best business conference
- Leadership conferences in Alaska
- Communication conference near me
Some keywords are used more frequently than others.
Generally speaking, the longer a keyword is, the less it will be searched for. It’s important your organization includes the right keywords in it’s Google Ads account.
We are addressing keywords first because they are the heartbeat of your Google Ads account. Everything else revolves around your keywords.
Get A Proven Marketing Plan That Increases Enrollments When You Book A Call Today!
Receive customized advice to help your school attract more families!
*Grant Tip: To get approved for the Google Ad Grants you will need to add at least 10 keywords to each of your 2 ad groups (more on ad groups later).
*Grant Tip: To get approved for the Google Ad Grants your account can’t contain any single word keywords.
HOW TO READ DATA IN THE KEYWORD PLANNER
We are going to learn how to create and export a keyword forecast from the Keyword Planner.
Ideally, you will want to perform one keyword forecast for each Ad Group in your Google Ads Account.
If you have 6 ad groups, you should also be doing 6 keyword forecasts to be sure you are reaching your target audience as effectively as possible (more on ad groups below).
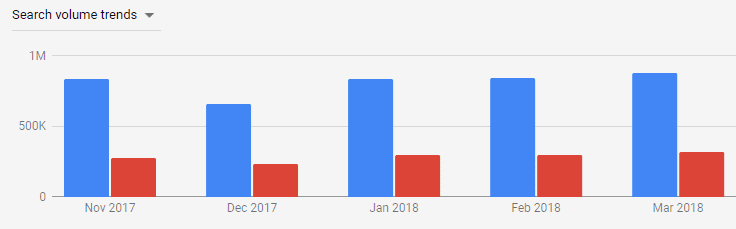
When you are inside the Google Keyword tool you will see Google search volume trends like the one below.
This graph shows the amount of Google searches in the United States for terms similar to “business conference” and “leadership conference”.
The blue columns represent all searches and the red column represents only mobile device searches.
After selecting a keyword, Google will give you data about it. Let’s briefly explain each data column Google provides. You can see this in the picture below.
Avg Monthly Searches: This specifies how many searches are normally made for that keyword each month.
Competition: This reveals how much competition you will have when showing ads for this keywords. Competition will either be low, medium, or high.
Ad Impression Share: This column will tell you the amount of market share your ads will control.
Page Bid: The last two columns in the picture specify how much you must be willing to pay per click to rank at the top of the Google search results page. For the top keyword, the minimum top of page bid is $2.06 and the maximum top of page bid is $13.50. Top of page bids will vary depending on the time of day, day of the week, season, etc.
Ex: Ads for Christmas trees will always cost more during the holiday season because there is a higher demand for Christmas trees at that time of year.
IMAGE
Get A Proven Marketing Plan That Increases Enrollments When You Book A Call Today!
Receive customized advice to help your school attract more families!
CONDUCTING KEYWORD RESEARCH

Keyword research is the practice of finding the words and phrases your target audience is searching for on the Google search engine.
By doing keyword research you will set your advertising account up for success from the very start.
Ex: Suppose your organization holds an annual business leadership conference.
As you begin doing keyword research you find that there are very few people in your area searching Google for “business leadership conference.”
Instead, you find that there is a large amount of searches for “leadership conference”.
If your organization wants as much exposure as possible, it’s valuable to know which search terms are searched for more or less frequently.
There are a number of many ways to do keyword research on the web we won’t go into here.
We will focus on Google’s free Keyword Planner that is available in Google Ads (which is excellent).
How To Research With Keyword Planner
1.) Begin by clicking the wrench in the top right-hand corner of Google Ads.

2.) In the “Planning” column, click on “Keyword Planner” in the drop-down menu.

3.) Click “Get search volume and forecasts”.

4.) Type words or phrases you think are ideal keywords for your nonprofit and click “Get Started”.

5.) On the top left-hand side of the screen click on “Keyword Ideas”.
6.) In the “Keyword Ideas” text field, type your keywords again to see more keywords your target audience are searching for. (Remember, you need at least 10 keywords per ad group.)
7.) Click the blue check-boxes on all of the keywords you want to add to your keyword plan. (This is the time to review data on each individual keyword.)

8.) Click “Add to plan”.
9.) Click on “Plan Overview” when you have finished adding keywords to your keyword plan.

10.) Review your plan overview. Decide if you are satisfied with the projected results of your chosen keywords.
In the case of the Google Ad Grants, we suggest you have at least $15,000 worth of monthly spending in your combined keyword forecasts. We have found that you don’t get as much traffic as the forecast thinks you will. Below are two images with the information you can expect to get from your keyword forecast. This information is projected for the next calendar month.


11.) When you are satisfied with your keyword plan, download it by clicking the downward facing arrow on the top right-hand side of your screen.

12.) Open the file in Excel or Google Sheets and make any final revisions to your keywords.
13.) Copy the keywords from the spreadsheet.
14.) Click on the appropriate ad campaign.
15.) Click on the appropriate ad group.
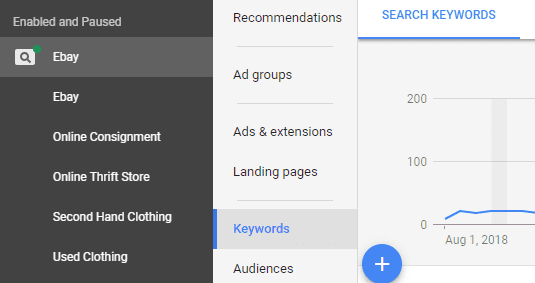
16.) Click on “Keywords”.
17.) Click on the blue and white plus sign.

18.) Paste your keywords into the box provided.
19.) Click “Save”.

Great work, you have added keywords to one of your ad groups. Be sure you add at least 10 keywords to both of your ad groups.
Get A Proven Marketing Plan That Increases Enrollments When You Book A Call Today!
Receive customized advice to help your school attract more families!
HOW TO ADD NEGATIVE KEYWORDS

If you don’t want an ad to be served to a particular search term, you can add that search term as a negative keyword.
Ex: If your organization is hosting a local business conference, you don’t want people entering “local business for sale” to see your ads.
By adding “local business for sale” as a negative keyword, people searching for this phrase will no longer see your ad.
Adding negative keywords helps to refine the search terms that will be served your organization’s ads. This is an important way to optimize your account.
Negative keywords can reduce the amount of money your organization spends on ads and will increase your campaign’s effectiveness.
It may be better to focus your efforts on spending as much of the grant money as possible before getting into negative keywords.
Once you’re spending the full $10,000 each month, then begin refining who sees your ads with negative keywords.
To add negative keywords follow the steps below:
- Click on the appropriate ad group.
- Click on “Keywords”.
- Click on “Negative Keywords”.
- Click on the blue and white plus sign to add negative keywords.
- Add a match types to your keywords. (See the section below on match types.)

UNDERSTANDING KEYWORD INTENT

Google’s search algorithm is an expert at analyzing intent behind each Google search.
When choosing keywords to add to your ad groups, think about the intent of each word or phrase.
If you are hosting a leadership conference you shouldn’t add every keyword that includes the words “leadership” and “conference”.
Consider the intent behind the keywords below.
- “how to start a leadership conference”
- “Tickets to leadership conference near me”
Both of the phrases above contain the words “leadership” and “conference.” Of course, you don’t want to advertise your own leadership conference to someone trying to start their own conference.
The intent of the first keyword does not match the intent of someone in your target audience.
It’s important to consider the searchers intent even among two acceptable keywords. Take two more keywords for example:
- “Tickets to leadership conference near me”
- “Best leadership conference near me”
Both keywords fit your target audience because they both seek to find a leadership conference to attend.
However, the first keyword is more valuable because it indicates that the searcher is looking to purchase a ticket.
For this reason, you should place more importance on the first keyword when considering how to advertise to each.
Keyword Match Types
After you have entered your keywords into your ad groups you can further specify who will see your ads.
Adding a match type to each keyword further restricts who Google can serve your ads to.
Proper use of match types can help you optimize advertising efforts and in some cases remain qualified for the Google Ad Grants.
Broad Match: Broad match shows your ad to the most possible people. This is the best way to spend a lot of money. Of course, Google likes this too, so it’s the default setting in all Google ads accounts. If your keyword is business conference Google will show your ad to anything it feels is similar to this keyword. Ads may be served to search terms like better business bureau or sales workshops in Nepal. This match type is highly generalized and can leave your ads with very low Click-Through Rates. You must keep a 5% CTR to comply with Grant Policy. Use this match type sparingly.
When entering broad match keywords into your Google Ads account, you will enter them into the keyword area exactly as they appear. Ex: business conference
Broad Match Modified: A broad match modified keyword will still be served to a wide range of searches. Advertisements will only show if the search term contains the words you specify. If your modified keyword is +business +conference, the term entered into Google must contain the words “business” and “conference” in order to see your ad. The Google search terms can be written in any order and include other words.
Ex: A search term that may trigger the broad match keywords above is best conference for business in TX. This search term contains both words. But they are not in the same order and the Google search contains other words.
When entering broad match modified keywords into your Google Ads account, you will enter them into the keyword area with a plus symbol in front of each word. The + indicates that each word must be included in order for an ad to be served. Ex:+business +conference
Phrase Match: Phrase match keywords tell Google that in order for an ad to be served, the search term must contain the phrase your keyword specifies.
If your phrase match keyword is “business conference”, the words “business” and “conference” must be searched in the same order for an ad to be shown. Google searches that can trigger this phrase match are business conference near me or best business conference Albuquerque. The exact phrase “business conference” is contained within both of these search terms.
When entering phrase match keywords into your Google Ads account, you will enter them into the keyword area with double quotes around your keyword. Ex: “business conference”
Exact Match: Exact match keywords tell Google that you are only willing to serve ads to Google searchers who have entered the exact keywords in the same order you have specified. If your exact match keyword is [business conference] the only Google search term that will trigger your ad is business conference.
When entering exact match keywords into your Google Ads account, you will enter them into the keyword area with square brackets around your keyword. Ex: [business conference]
You can always go back and change the match type of keywords.
Get A Proven Marketing Plan That Increases Enrollments When You Book A Call Today!
Receive customized advice to help your school attract more families!
CREATE YOUR FIRST GOOGLE AD CAMPAIGN

*Grant Tip: You will need only 1 ad campaign to get approved for the Google Ad Grants.
You can create an advertising campaign by following the steps below:
1.) Click the “All campaigns” button.
2.) Then click the “Campaigns” button.
3.) Click the blue button with the white plus on it.
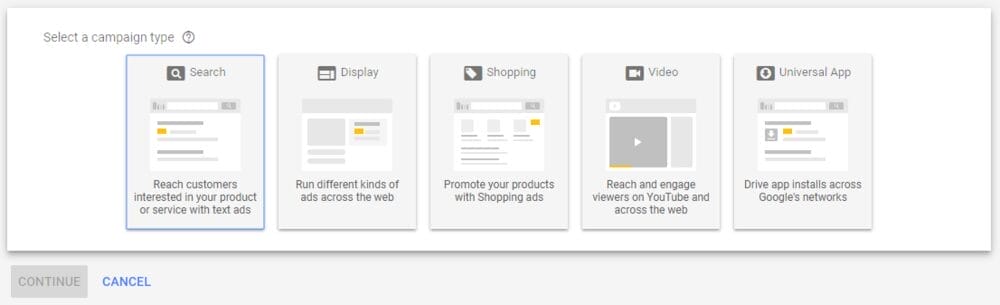
4.) Click “new campaign”.
5.) Choose the “Search” option and click continue. (If you choose any of the other options you will not qualify for the Google Ad Grants.)
6.) Choose what you want your campaign to accomplish (sales, leads, website traffic).
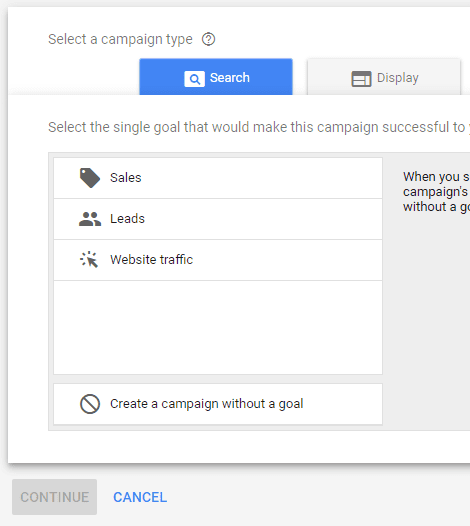
7.) Select the action you want visitors to take (website visits, phone calls, store visits, app downloads). Then click “Continue”.
8.) Enter the name of your new campaign. (This can be changed later.
9.) In the networks box, uncheck both boxes that say “Include in Google search partners” and “include in Google Display Network”. The Google Ad Grants only permits Google search ads on the Google Search Network. You can’t include “search partners” or the “Display Network”.
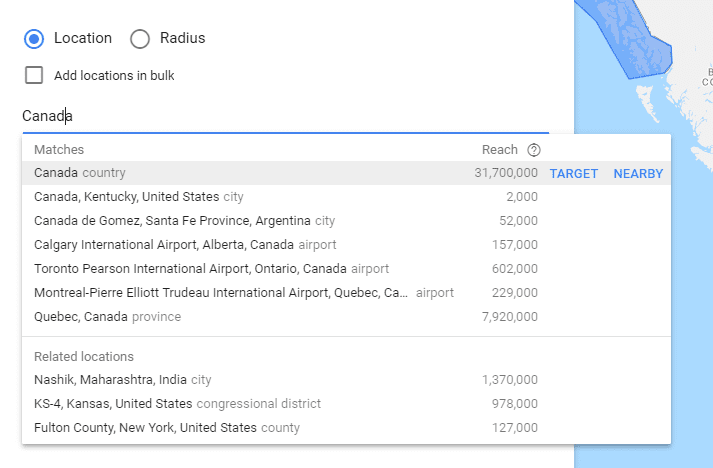
10.) In the “Locations” box, choose where you would like your ads to show. You can choose a geographic area by country, state, city, county, or zip code. You can select more than one location.
A.) If you would like to serve ads within a certain distance from your physical location, click “Advanced search” in the location box.
B.) Follow the steps for Radius Targeting below.
11.) In the “Language” box, choose your language.
12.) Enter $329.00 into the budget box. (This is the maximum amount a Grant account can spend per day.)
A.) Side Note: Your Account level budget must remain at $329.00 indefinitely to remain qualified for the Google Ad Grants.
B.) You can set campaign level budgets (like the one you’re creating now) lower than $329 if you would like to limit the spending of this specific campaign. This can be helpful if you’re advertising nationwide.
13.) In the “Bidding” box, set your focus to clicks and set your Cost Per Click to $2.00.
A.) Later we will revisit this setting and change it from clicks to conversions. For this, see our conversions section below.
14.) Click “Save and Continue”.
Great work! You have successfully set up your first Google Ads Campaign. To continue setting up your first ad group, see the ad group section below.
SETTING UP CAMPAIGN LOCATION TARGETING

Depending on your organization’s advertising goals, you may want to show your ads in different geographic areas. This is set at the campaign level.
Ex: If your goal is to attract more volunteers or promote a monthly event you would generally want to show ads within driving distance.
Ex: If you would rather promote digital content on your website, nationwide ads may be your best option.
Location Targeting: To target your ad campaign to a specific geographic area (country, state, city, county, etc):
1.) Click on the campaign you want to set up geotargeting on.
2.) Click on “Locations”.
3.) Click on the blue and white pencil icon to add and remove geographic areas you want to target.

4.) Click the blue circle next to the word “Location”.
Get A Proven Marketing Plan That Increases Enrollments When You Book A Call Today!
Receive customized advice to help your school attract more families!
5.) Enter the name of the location you want to target in the text field.
6.) Click “Target”.
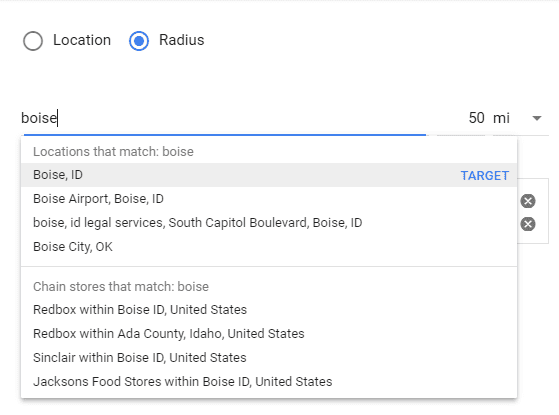
Radius Targeting:

To target your advertising campaign within a set distance from your physical address (Ex: 30-mile radius):
How To Setup Google Ads Radius Targeting | Geotargeting Walkthrough 2019
- Click on the campaign you want to set up geotargeting on.
- Click on “Locations”.
- Click on the blue and white pencil icon to add or remove geographic areas you want to target.
- Click the blue circle next to the word “Radius”.
- Enter the name or physical address of the location you want to target in the text field.
- Select the longest distance you want ads to be served from your physical location.
- Click “Target”.
CREATE YOUR FIRST AD GROUP

*Grant Tip: To get approved for the Google Ad Grants your organization must have two ad groups within the advertising campaign you created above.
1.) To create an ad group, click on the campaign you created above.
2.) Click on “Ad groups”.
3.) Click the blue button with the white plus on it.

4.) Name your ad group. (You don’t need to add keywords at the point.)

5.) Click “Save and Continue”. (See our section on writing ads below.)
Amazing! You have finished creating your first ad group. Don’t forget to make a second ad group so you will qualify for the Google Ad Grants.
CREATE AND WRITE YOUR FIRST TEXT AD

*Grant Tip: To get approved for the Google Ad Grants you must create 2 ads in each of your ad groups (4 ads total).
Learn how to create Google ads below:
1.) Click on the appropriate campaign.
2.) Click on the appropriate ad group.
3.) Click on “Ads & Extensions”.
4.) Click on the blue plus icon under the ads tab.
5.) Click on “Text Ad”.
6.) Write your ad (See what to write in each section below).
7.) Click “Save And Add Another” when you have finished your first ad.

Get A Proven Marketing Plan That Increases Enrollments When You Book A Call Today!
Receive customized advice to help your school attract more families!
HOW TO WRITE EACH SECTION OF AN AD
Final URL: In the “final URL” field, enter the web address of the landing page you want your ad traffic sent to. We will cover more about landing pages later on in the course. For now, enter the web address for your organization’s “About” page (www.myorganization.org/about). Be sure you don’t enter your home page as the final URL. Google will not approve ads that lead to a home page.
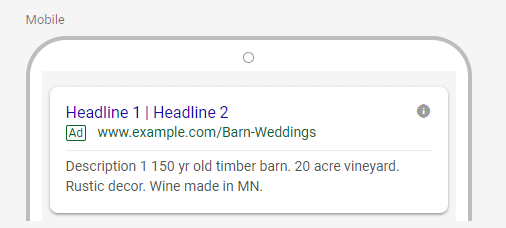
Headlines 1 & 2: The first headline should be something that is instantly going to catch someone’s eye. Put yourself in the searcher’s shoes. What would get your attention if you were searching for the same thing on Google?
It’s generally a good idea to include your organization’s name in one of the top two headlines. Your keywords should also have an influence on these headlines as well. If your ad group’s core keywords are similar to “barn wedding venue”, then your headline might say “Best Barn Venue in NY” or “Rustic Barn Wedding Venue”. If you’re advertising a barn wedding venue, you shouldn’t stray from your keywords by mentioning a fancy church chapel that is also available. Serve “old barn wedding venue” ads to “barn wedding venue” keywords and serve “church chapel wedding venue” ads to “church wedding venue” searches. The closer your ads match your keywords, the more likely Google is to show your ad and the higher the click-through rates on your ads will be.
Headline 3: Headline 3 will not show every time the ad is served. Google’s search algorithm will decide if this headline will show to individual searchers. For this reason, don’t put critical information about your ad in this area. Include something that would benefit your ad, but not leave a hole in your information if it doesn’t show up.
Display path: The display path is the green text in the image below. This area indicates the type of page that someone will be sent to after clicking on your ad. Be sure you are using your keywords as a guide. The display path helps alleviate the fear of not knowing what will happen when someone is considering clicking your ad. If the display path says “Barn-Wedding” and the searcher is then re-routed to a page advertising a rustic indoor chapel, they will feel deceived and leave. Write your display path to reflect the page viewers will be redirected to as accurately as possible.
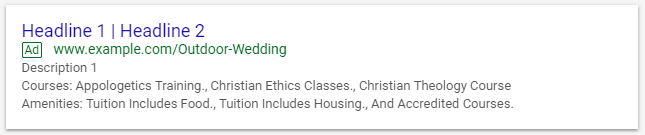
Description 1: Describe any sign-up incentives you have to offer. Explain your core product or service.
Description 2: This description will not be served with every ad. Include your most important information in the first description. The information in this description should take a supportive role to the first description.
6 GUIDELINES FOR WRITING A+ GOOGLE ADS

1.) Use Up All The Space: The general consensus among digital marketers is to take up as much space as possible with your ads. If you are able to push your competitor’s ads down the Google search results page, your ad is more likely to be clicked on. This means you should take every opportunity to fill the space in your ads. Check out the image below to see who is using their space effectively.
2.) Mix Things Up: We suggest you have three ads within each ad group. Make each ad as different from the others as you can and don’t be afraid to experiment. After a month of serving all three ads, you will be able to see which are performing well and which aren’t.
3.) Include A Call To Action: People generally won’t take action unless you ask them too. In one of your headlines or in a description, tell viewers what you want them to do. Include text like “Click Now”, “Click Here For More Info”, or “Get 50% Off When You Call Today.” Your target audience should fully understand what you want them to do. How many of the ads in the image below feature a clear a call to action?
4.) Find Inspiration: Exhaust your own ideas as you write ads, then look up other similar ads on the Google search engine to find more inspiration. Look at the image below. What types of ads are at the top of the page? Which are the most professional and why?

5.) Don’t Look Spammy: If your ads are in all CAPS, have exclamation points, or anything else Google deems to look like spam, your ad will not be approved.
We suggest keeping your ads uniform. Capitalize only the first letter of every word. Either use periods throughout or don’t use them at all. Don’t capitalize every letter and avoid exclamation marks. You can’t use trademarked words like “CNN” or “Fox News” without having approval from the trademark holder. Above all, keep your ads honest.
Get A Proven Marketing Plan That Increases Enrollments When You Book A Call Today!
Receive customized advice to help your school attract more families!
6.) Ad Previewer: It’s helpful to reference the ad previewer on the right-hand side of your screen while writing your ads. If you click the arrows at the top of the ad previewer, you will cycle between your mobile ad and your desktop ad.
HOW TO OPTIMIZE YOUR ADS IN THE GOOGLE AD GRANTS

Optimize is just a ten cent word that means to make something better over time. That’s what you want to do with your advertisements. Over time your organization’s advertisements should continually be more efficient as a result of your optimizations.
*Grant Tip: To remain eligible for the Google Ad Grants after being approved, your account must maintain a Click-Through Rate (CTR) of 5% or better.
To have a highly optimized and effective Google Ads account, you will want to check on your ads every 7-14 days to see which ads are working and which aren’t.
It’s best if each ad has at least a few hundred clicks (if not a thousand) before making changes to your ads.
When you feel you have enough data, go into each ad group and examine which ads are performing best.
Pause the ad(s) that are performing poorly. Write new ads that you believe will outperform your best ads. This strategy is known as A/B testing. When you have multiple ads competing with one another, you are able to continuously optimize your ads by removing poor performers and testing new ones.
To be sure all of your ads are accumulating data over the course of 30 days, we suggest you choose “Do not optimize” in the ad rotation settings discussed below.
GOOGLE AD GRANTS AD ROTATION SETTINGS

When creating ads, you will want to specify how and when your ads are served.
Optimized: This setting allows Google to observe ads in each ad group and decide which one performs best. The best performing ad is then shown 100% of the time. This feature is generally helpful for less experienced Google Ads users. The downside is that ads are often determined to be the “best performing” with very little data to back up the decision. Allowing Google to favor a single ad means there will be very little data on other ads to make optimization decisions with later.
Do not optimize: This means that your ads will be shown (more or less) equally. If you have three ads, each one will be shown about ⅓ of the time.
Follow the instructions below to check ad rotation settings:
1.) Click on the campaign you would like to set ad rotations on.
2.) Click on “settings”.
3.) Click on “additional settings”.
4.) Click on “ad rotation”.
5.) Choose either “Optimize: Prefer best performing ads” or “Do not optimize: Rotate ads indefinitely”.

If you are enjoying this post on the Google ad Grants, you might also love our post: Digital Marketing For Churches: The World’s #1 Church Marketing Guide.
CREATE YOUR FIRST GOOGLE AD GRANT AD EXTENSIONS
Google Ad extensions are an additional piece of information you can include with your ads to expand its size and informational content. We suggest you experiment with each type of Ad extension and decide which will work best for your company. Most of our clients have as many as 20 ad extensions active at any given time. The Google Ad Grants only requires you have four extensions.
*Grant Tip: To get approved for the Google Ad Grants you will need:
- 2 call-out extensions
- 2 sitelink extensions
Setting up your first call-out extension:
Get A Proven Marketing Plan That Increases Enrollments When You Book A Call Today!
Receive customized advice to help your school attract more families!
A callout extension is an additional area in your ad that will calls attention to important aspects of your product or service.
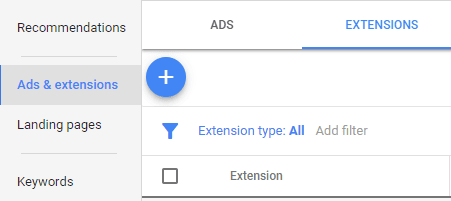
1.) Click on the appropriate campaign.
2.) Click on “Ads & extensions”.
3.) Click on “Extensions”.
4.) Click on the blue plus icon.
5.) Click on “Callout Extensions”.

6.) Choose if you want to add your callout extensions to the ads in your ad group, campaign or to all ads in your account.
7.) Fill out each “callout text” area with a quality of your organization you would like to draw attention to. (Ex: “Free Shipping”, “10:00 a.m. Service Time”, or “Open 9-5 Mon-Fri”.)
8.) Click “Save”.
Set up your first sitelink extension:
A sitelink extension is a text area under the main advertisement that directly links to important pages on your website (Ex: About Us, Contact, Staff, etc).
While you only have to create two callout extensions to apply for the Google Ad Grants, we suggest making at least four. Four sitelink extensions can show on a single ad. This greatly increases the size and quality of each individual ad.
1.) Click on the appropriate campaign.
2.) Click on “Ads & extensions”.
3.) Click on “Extensions”.
4.) Click on the blue plus icon.

5.) Click on “Sitelink Extensions”.
6.) Choose if you want to add your sitelink extensions to only ads in your ad group, campaign or to all ads in your account.
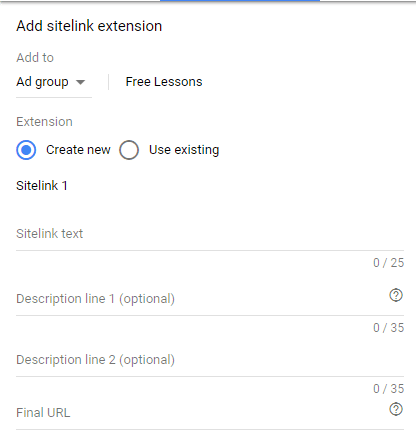
7.) In the “Sitelink Text” field, enter the page of your website the extension will link to (Ex: “About Us”).
8.) In the description fields, describe what the user can expect to find at the page they will be linked to.
9.) In the “Final URL” field, enter the URL of the web page this extension will link to.
10.) Fill out the three additional sitelink extensions that appear on your page.
11.) Click “save”.
More Google Ad Extensions
Call Extensions: This type of extension allows mobile browsers to call your organization directly from your ad. Your organization’s phone number is added to your advertisements.
Structured Snippet: This type of extension allows your organization to add shortlists of categories, features, products, or services to your ads.
Location Extensions: This extension links with your location on Google Maps and allows users to see your organization’s location.
App Extensions: An app extension allows users to download your app directly from your ad.
Others: There are about six other less frequently used extensions. Again, experiment with these extensions and see what works best for your organization.
Get A Proven Marketing Plan That Increases Enrollments When You Book A Call Today!
Receive customized advice to help your school attract more families!
GOOGLE AD GRANTS: CREATE YOUR FIRST LANDING PAGE

When someone clicks on one of your Google ads, they will be redirected to a landing page. An important rule in PPC digital marketing is to never send traffic from an advertisement to your home-page. When you send paid traffic to a normal page on your website, that person will most likely leave your website after about 3 seconds. You will have paid for them to click on your ad and only to disappear back into Google’s abyss before you get anything worthwhile in return.
When you pay for advertising, you want your paid visitors to take a specific action. Maybe you want them to sign-up on an email list or make a purchase. A landing page helps you reach these goals.
A landing page is a specific type of web page you will need to create on your organization’s website. In an ideal situation, you should have one landing page for each ad group in your Google Ads account. (Some of our clients have as many as 20+ landing pages) Below is an image of a basic landing page layout.

A landing page is different than other pages on your website. A landing page should consist of the following 14 guidelines. Each of these guidelines increases the likelihood a visitor will take action.
1.) Landing pages should have a clear and compelling title.
A good landing page title will let the page visitor know they have “landed” in the right place. You can let visitors know they are in the right place by using the same language and promotional offers used in your advertisement. If your ad promoted free consultations, the title of your landing page could be “Book Your Free Consultation With XYZ Corp Today!” A good title will also let visitors know what you want them to do.
2.) Landing pages should include your logo.
Generally, you will see an organization’s logo at the top left-hand side of the landing page.
3.) Landing pages should have one strong call to action (CTA).
A “Call To Action” is what you are asking your visitors to do. A good landing page generally have only one call to action. Ex: “Sign-up Today”.
Too many landing pages are either unclear about what they want visitors to do or they ask visitors to do a bunch of things. Your landing page should have a single, clearly stated CTA. This increases the likelihood your visitors will take the action you’ve requested them to.
This means you will need to decide what you want visitors to do. If you don’t know what you want people to do on your landing page, they certainly won’t figure it out either. You may want to increase your audience by getting email sign-ups. If you operate an e-commerce store you will want to make sales. You can ask people to download your app or call your organization. When a visitor completes your call to action they have “converted”. Tracking conversions is one of the main functions of a landing page and this can’t be done without a clear CTA.
4.) Landing pages should not have a navigation bar at the top of the page.
Allowing people to click on your navigation menu and leave the landing page makes it less likely they will perform your CTA.
5.) Landing pages should speak directly to the people who will click your ads.
Create one landing page template, then duplicate the page as many time as you need. You should have one landing page per ad group. Change the title and information on the landing page to speak specifically to the people who will be clicking on the ads within your ad group.
Ex: If the ads in your ad group say “Click And Book A Free Consultation Today”, the landing page should speak directly to the CTA on your ads. The headline on the landing page might say, “Book Your Free Consultation With XYZ Corp Today And Get 15% Off Your First Purchase”. Each landing page should specifically address the advertisements that send them traffic.
6.) Landing pages should have no links or buttons to other pages.
Links and buttons to other pages will decrease your conversion rate. You may need to remove the footer and any other links that may be on the landing page. A landing page is a stand alone page that is only accessed by people coming from your ads. It should not send people to other parts of your website. People on your website should not be able to access a landing page designated for your Google ads.
7.) Text on landing pages should be short, punchy and to the point.
The majority of web surfers don’t read blocks of text, they skim bolded text and bullet points. Keep your offer short if you can. Use lots of bullet points, bolded text, and numbered items. Keep your content simple and skimmable.
8.) Landing pages should offer a valuable incentive.
An incentive on your landing page is called a lead magnet. Ex: “Sign-up Today and Get Your Free Ebook” Nobody likes giving away their personal information for free. Minimize the information you ask for. Do you really need their last name? Give as much value in exchange for their information as you can. Offer an ebook, a free tour, a free consultation or a discount when they sign up.
9.) Landing pages should not contain any ads.
We would suggest your website not contain any ads. Ads on your website diminish the trust of your visitors. People feel like you want to make a quick buck off of them and it makes your website look tacky.
Get A Proven Marketing Plan That Increases Enrollments When You Book A Call Today!
Receive customized advice to help your school attract more families!
10.) Landing pages should have testimonials or other forms of social proof.
If you have people who are excited about your organization, ask them to write a 1-2 sentence testimonial about how great your organization is. Include the testimonial on your landing pages.
If you have high-quality product reviews include some of them on your landing page.
11.) Landing pages should include trust-building indicators.
Http vs https. The “s” at the end of http communicates to visitors that your page is secured through advanced encryption. Some web browsers will even alert your visitors when they enter a website without the “s” indicator. Be sure your page is secured.

Other trust-building indicators may be small images that indicate awards your organization has received, what your rating is with the Better business bureau, etc. Maybe your website is “McAfee Secured”. It has been shown in multiple studies that all of these things build a powerful subconscious trust in your website visitors that increases the likelihood they will complete your CTA.

12.) Landing pages should include at least one image.
Usually, the main image sets a subconscious feel for your brand. A landing page for a nursing home might have a group of happy seniors playing bingo. It’s usually good to add more white to the image with a fader or other tool in your website. The goal of the picture is not to draw direct attention as much as it’s meant to set the tone of your landing page. Placed over the picture are the page title and subtitle.
13.) Landing pages should include conversion tracking.
Conversion tracking allows you to know how many people are taking action on your page. If you have 3 landing pages and one is underperforming, you may want to take a second look at it to see how to improve the design. Conversion tracking can tell you the conversion rate, cost per conversion, and sometimes your ROI. We will cover conversion tracking shortly.
14.) A landing page has a partner ‘Thank You’ page.
For every basic landing page, there should be a Thank You page. The only way for a visitor to reach this page is by completing the CTA on your landing page. A good thank you page will thank the visitor for taking action and then offer them a second, higher commitment CTA.
Ex: Suppose the call to action on your landing page said “Send Me My Free Brochure” like you see in the image below. When someone completes this CTA and are rerouted to your Thank You page, you can show them the next step. This might say “Get One Free Tour As Our Thanks For Signing Up. Schedule Your Free Tour Below”.
Lastly, a good Thank You page will include a conversion tracking code. Because the only way to access this page is by completing the CTA on the preceding landing page, every time the thank you page loads, you know a conversion has taken place. A conversion tracking code counts the number of page loads and allows you to see this data in Google Ads. We will set up this conversion tracking in the section below.

Each of these elements increases the likelihood that a website visitor will act on your CTA. It’s not always possible to include all of the elements in every landing page, but the more the merrier.
HOW TO MAKE A LANDING PAGE

Whether you use Wix, Squarespace, WordPress, or another website builder, making a landing page is usually pretty simple. On most website builders, you will create a page just like any other, then drag and drop elements into a landing page format. You may need to edit the settings for the landing page to remove the navigation bar and the footer.
If you are unable to create a landing page on your home website, you have the ability to make high-quality landing pages on Instapage.com for a reasonable price. Our video walk-through (above) demonstrates how to create a landing page on Instapage.
Publish Your New Landing Page: Once your landing page is complete, be sure it’s published. If your landing page isn’t live, people who click your ads will not see be sent to a blank web-page.
Linking Ads and Landing Pages: We initially linked all your Google advertisements to the “About Us” or “Contact Us” page of your website. Copy the URL of your newly created landing page and paste it into the URL section of each of your Google Advertisements.
IMPLEMENT GOOGLE AD GRANTS CONVERSION TRACKING

*Grant Tip: To get approved for the Google Ad Grants you will need conversion tracking set up for 1 ad group.
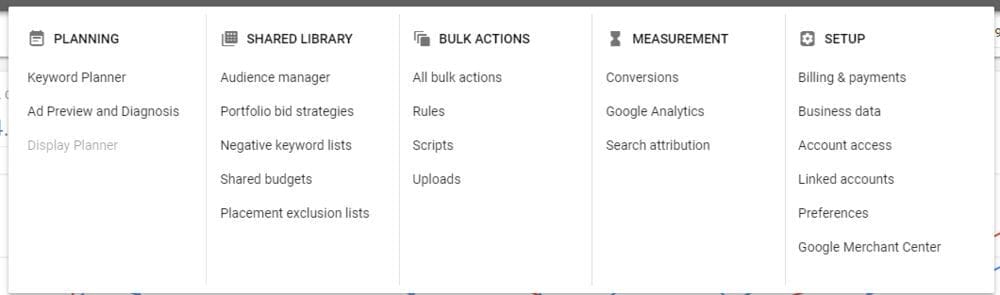
1.) To begin implementing conversion tracking with Google Ads, click on the wrench on the top right-hand side of your Google Ads account.

2.) In the “Measurement” column, click on “Conversions”.
3.) Click on the blue plus icon to create your first conversion.

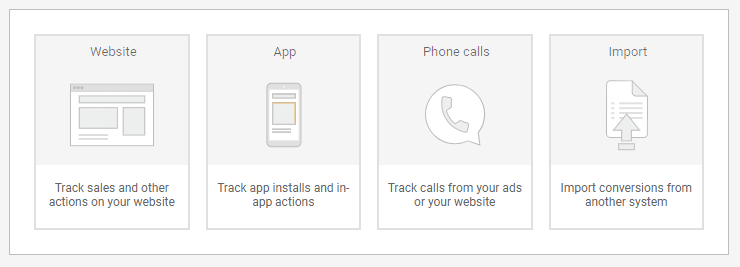
4.) Choose “website”. (If you want to track conversions from phone calls or app downloads you can always set these up later. We will focus on website conversions because they are used most frequently.)
5.) In the Conversion Name box, enter a name. (Ex: Email list sign-ups)
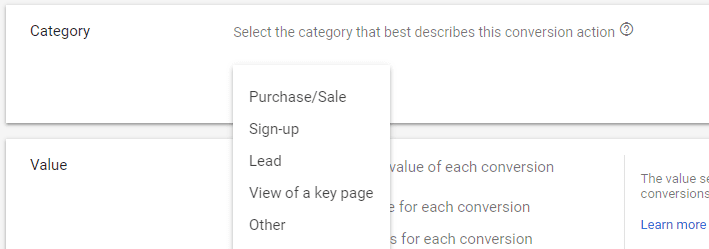
6.) In the “Category” box, click the ▼ arrow and select the category that fits your conversion type best. (I’ll choose sign-up)
7.) We suggest you choose “Don’t use a value” while you’re starting out. If you want to set up more advanced conversions you are able to determine their value using the other settings.
Get A Proven Marketing Plan That Increases Enrollments When You Book A Call Today!
Receive customized advice to help your school attract more families!

8.) In the “Count” box choose “One”.
9.) Click “Create and Continue”.
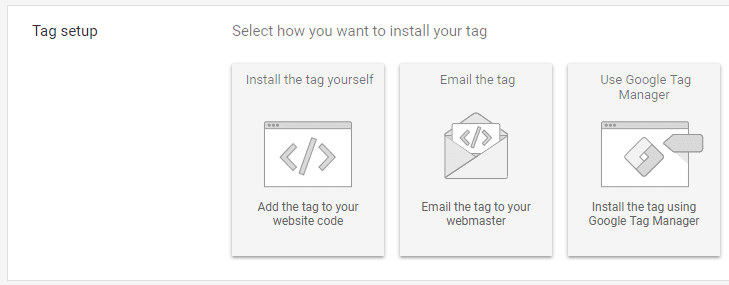
10.) Click “Install the Tag Yourself.”
11.) Copy and paste your global site tag into the appropriate location on your website builder. This may be a code injection area or the HTML source file. You may need to consult your website’s custom service team to find the appropriate area to past your tag.

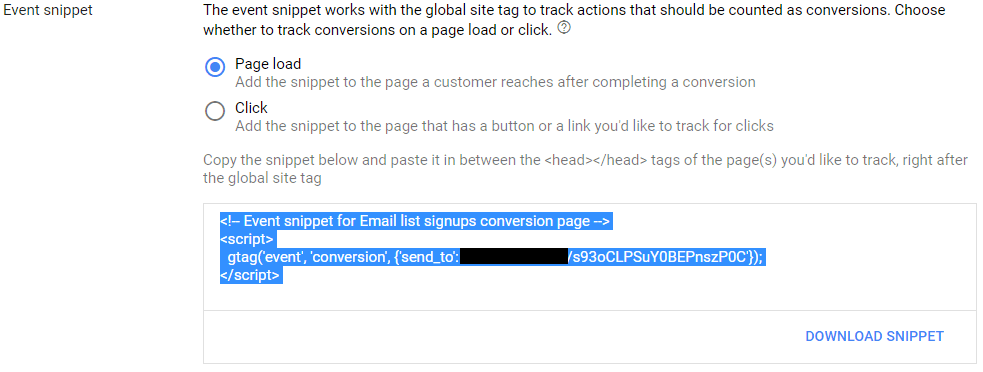
12.) Choose “Page load”. Choose page load if you want to track every time a thank you page loads.
13.) Copy and paste your “Event snippet” into your thank you page HTML code area. (This event snippet will only register when your Thank You page is activated. Every time someone completes the CTA on your landing page they will then be sent to the Thank You page. When the thank you page loads it will activate the event snippet and register a conversion in your Google Ads account.)
14.) Click “Done”.
When you are back to the “Conversion Actions” page look to see the status of your newly set up conversion. If your conversion status reads “unverified”, Google may be waiting for the event to be triggered to be sure it works. If this is the case, visit your landing page and complete your own CTA to trigger your conversion tag.
If your conversion status reads “No Recent Conversions” or “Recording Conversions”, you should be good to go. Great work.
Lastly, you will need to change your Advertising Campaign Bid settings from “Maximize Click” to “Maximize Conversion”. To do this follow the instructions below.
1.) Click on your advertising campaign
2.) Click “Settings”
3.) Click on “Bidding”
4.) Select “Conversions” under the heading “What do you want to focus on?”.
GOOGLE ADS ACCOUNT REVIEW CHECKLIST

You have not entered billing information into your Google Ads account.
- Your account level budget is set to $329.00 per day.
- Your campaign level bid settings are set to conversion tracking.
- You’ve created 1 ad campaign.
- You’ve created 2 ad groups.
- You’ve created 2 ads in each ad group (4 ads total).
- You’ve added at least 10 keywords to each ad group.
- You’ve created at least 2 Sitelink extensions.
- You’ve created at least 2 Callout extensions.
- You’ve created at least 1 landing page and 1 thank you page.
- You have conversion tracking set up on at least 1 thank you page.
Get A Proven Marketing Plan That Increases Enrollments When You Book A Call Today!
Receive customized advice to help your school attract more families!
STEP 7: ENROLL FOR THE GOOGLE AD GRANTS

Before enrolling for the grant, call the Google Ads customer support line (1-877-509-4297) and have a Google Ads account specialist review your account. Be sure you let them know your account should be set up in accordance with Ad Grant policy. Then ask them to review the account to be sure everything is set up properly to be approved for the grant. Once they give you the all clear, enroll for the grant. This review could save you a few days to find out something was left uncompleted.
To enroll for the Google Ad Grants follow the steps below:
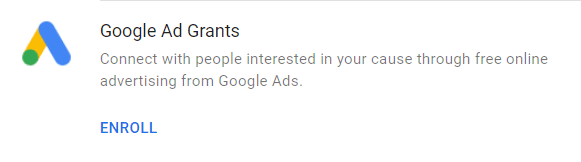
1.) Sign into your Google For Nonprofits account with the email you set up in STEP 2.

2.) Click on the “enrollments” tab.
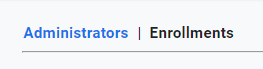
3.) Scroll down to “Google Ad Grants”.
4.) Click “Enroll.”
Once you have enrolled for the Google Ad Grants on the Google For Nonprofits ‘enrollments’ page, it can take up to 3 days for it to be reviewed. If your enrollment is declined, don’t sweat, you can re-enroll as many times as needed. I have come to expect all my clients to be denied acceptance at least once before being approved for the grant. There always seems to be a policy that was changed or something you weren’t aware of before.
If your enrollment is declined, read over the email they send that specifies the reason you were declined and resolve the issue. If the problem is a bit more complex you can always call the support number again.
After you are approved by the Google Ad Grants review team, you will get an email that begins as you see below. The last thing you need to do is to accept the terms and conditions by clicking on the link provided.

Congratulations! You have been approved for the Google Ad Grants!
There is only one thing left to do. Accept Google’s Terms and Conditions. In your account, you will see a banner like the one below.

On the far right of this banner it will say “Fix It”.
- Click Fix It.
Once you have clicked this button you will see a popup window appear as shown below.
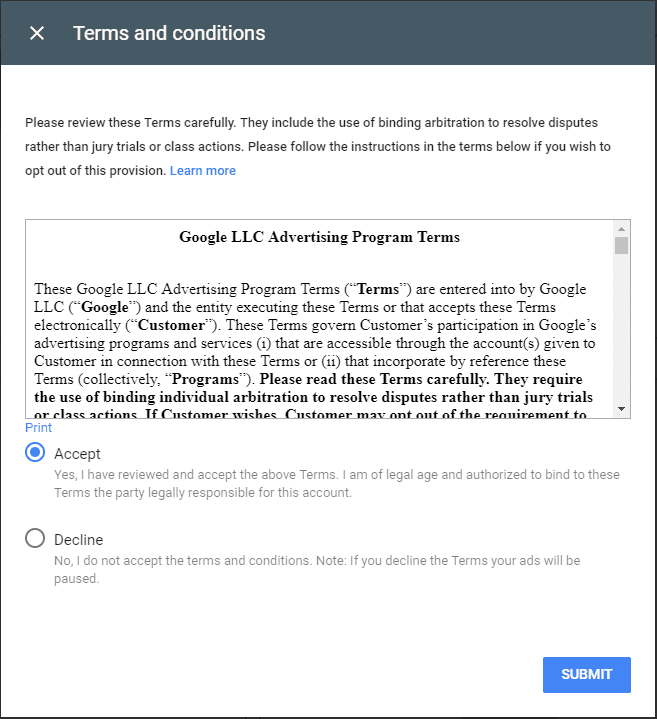
- Pull the scroll bar to the bottom of the scroll box.
- Click the Accept button.
- Click Submit.
You have now accepted the Terms and Conditions of the Google Ad Grants and your ads should begin running within 24- 48 hours.
MAINTAINING THE GOOGLE AD GRANTS
Once you have been approved for the Google Grant the heavy lifting is finished. With that said, there is still work that must be done on a monthly basis to remain compliant with Grant policy. Google grant management can be tricky, so we have created a list of what you will need to do on a monthly basis to keep your grant.
Annual Survey: Check your email once you are approved for the grant and take the annual survey right away. I have seen Google Grants deactivated within 4 days of being approved because this survey wasn’t completed (and it took almost 30 days to get re-activated). You can also find the survey by clicking here.
Keyword Quality Score: Be sure you don’t have any keywords in your account that have a quality score of 1 or 2.
Click-through rate: Your account must maintain a 5% click-through rate or higher to remain qualified for the Google Ad Grants.
Get A Proven Marketing Plan That Increases Enrollments When You Book A Call Today!
Receive customized advice to help your school attract more families!
Single keywords: Your account can have no single word keywords. All keywords must contain at least two words.
Ex: You cannot have “conference” as a keyword but you can have “business conference”.
Google Ads Account: All of the criteria necessary when setting up the Google Ads account will still apply.
Non-Compliance Notices
Below are two images. The first image is what you can expect to see in your email inbox if your account is non-compliant with grant policy. It’s non-threatening and doesn’t clearly say “you’re non-compliant”, so it’s easy to overlook.

When you open your non-compliance email you’ll see what shown on the image below. Click on the blue button to see the problems that need to be resolved. It’s best to do weekly or bi-weekly account audits to avoid getting these email in the first place.

After clicking the blue button in the email you will see your compliance report which will look like this.
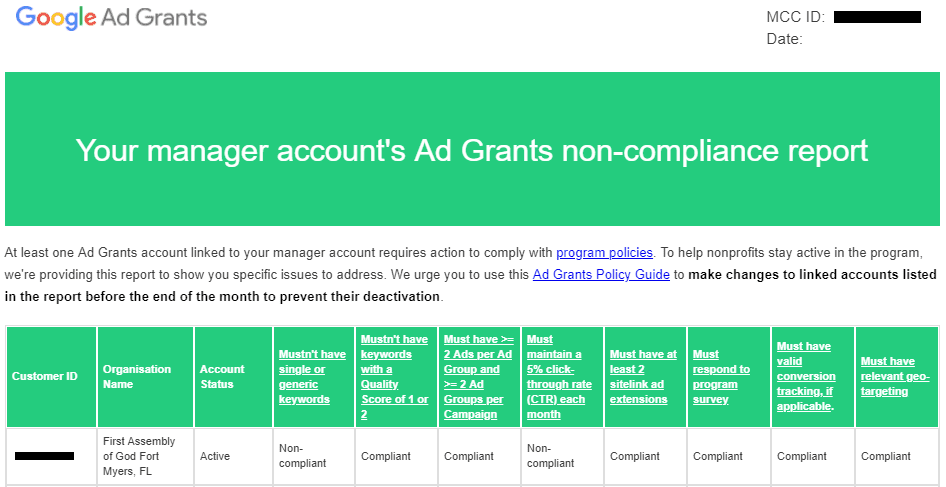
Fix your areas of non-compliance and resubmit your account for review via the red banner in your AdWords account.
Account Deactivated

If for any reason your Google Ad Grants account is deactivated for not complying with Grant Policy, you must fix all relevant issues and submit your account to be reviewed and re-approved for the Grant.
You should find the issues with you account in the Email associated with your Google For Nonprofit account.
We have seen the re-approval process take between 4 and 30 days.
Well, that about sums up the process to get Google Ad Grants for churches & nonprofits. With some determination and by following the steps above, you will be attracting lots of eyes to your organization!
If you would rather save yourself the work, feel free to book a free consultation with us by clicking the “Schedule My Free Google Grant Assessment!” button below.
What questions do you have about the Google Grant?
Let us know in the comments!

Responses
You did not go into what it takes to KEEP your grant – which is not simple and so important. There are activity rates which must be met, reporting to Google each month and many more details which must be kept up with and documented on monthly reports to keep your grant active. These are not always simple and require time and someone who knows how to manage these tasks and complete and submit the required reports. Hiring someone for these tasks can be costly.
Dawn, Thank you for pointing this out! We will take some time and expand this article to include the monthly requirements as well!
[…] free traffic from Google using church SEO, you’re going to love our ultimate guide about the $10,000 PER MONTH Google Advertising Grant. Google gives churches and nonprofits $10,000 per month to advertise on the Google Search […]
Oh my goodness! Amazing article dude! Many thanks, However
I am going through issues with your RSS. I don’t understand why I am unable to
join it. Is there anybody having the same RSS issues? Anyone who
knows the answer will you kindly respond? Thanks!!
Hello,
Thank you for your comment, I will have one of our team members look into our RSS feed that you are having issues with.
Thank you so much – this is a well-thought-out, exceptional guide. Much appreciated.
Thanks for your comment, Josh! Feel free to get in touch with us if you have further questions about your Google Grant.